Sunday, January 15, 2012

I'm Addicted To Baking

I'm currently saving up for a new camera. My current camera (I'm embarassed to say it's just a point and shoot), was accidentally left at my parent's house over the holidays. I'm currently stuck with my Andoid phone camera, which I believe is a whopping 5 Megapixel camera. That was painful to type.

In honor of my really sad cameras, I've decided that this post will be brief and about my new addition to baking!

Last night I baked thick coconut cookies topped with fresh caramel cream and a little sea salt. I found the original recipe in Martha Stewart Living and I tweaked it a little. SOOO delish! I snuck down at midnight for another one before bed. Recipe is below.


Coconut Thumbprints with Salted Caramel
Yield: about 54 cookies
adapted from Martha Stewart Living
Ingredients
  • 3 sticks unsalted butter, softened
  • 1 cup sugar
  • 1 1/2 teaspoon vanilla
  • 4 eggs, divided
  • 3 1/2 cups all-purpose flour
  • 1/2 teaspoon salt
  • 12 ounces sweetened flaked coconut
  • 44 small caramel candies (12 ounces), unwrapped
  • 6 tablespoons heavy cream
  • sea salt
Instructions
  1. Preheat oven to 350F.
  2. Beat together butter and sugar with a mixer on medium speed until pale and fluffy, then beat in vanilla and 2 of the eggs.
  3. With mixer on low, gradually add flour and the 1/2 teaspoon salt, and beat to combine.
  4. Press dough together in plastic wrap, then roll into 1 1/4-inch balls. Beat the 2 remaining eggs in a small bowl. Dip each ball in the beaten egg and roll in coconut. Place balls on parchment-lined baking sheets, and press an indentation into each with your thumb.
  5. Bake for 10 minutes, then remove sheets from oven, and re-press indentations. Bake cookies until golden, 9 to 10 minutes more. Let cool on wire racks. Repeat with remaining dough.
  6. Place caramels and heavy cream in a small saucepan over low heat. Cook, stirring constantly, until the caramels are melted and mixture is smooth, 4 to 6 minutes. Spoon into indentations in cookies, and sprinkle with sea salt. Rewarm caramel if it hardens before all cookies are filled.


I'm also in love with the blog Not Without Salt. I plan on using a lot of recipes from that site and I'll be happy to review them for you here. The only problem is that I need a good camera to take photos of my creations and recipes. So here's hoping that my next post includes shots taken with my new camera!

Thursday, January 5, 2012

Lili Reese Hats

Both of my daughters are cursed blessed with thick, crazy curly hair. It makes for a great conversation starter ("where did they get those curls?") but it makes for long mornings of fighting grooming and dreaded hair washings and comb outs.

Instead of trying to cope with their hair each and every day, I devised a sly plan to keep them fashion-forward while covering up for my lazy attitude. On days when I just can't face another hair tantrum (my kids actually start screaming when the see a brush or comb), I just put a hat on their heads!


Eventually, enough people stopped me on the street or in the store, inquiring where to get such hats. I decided to start selling my creations. I make them in any color combination and my girls pretty much have a hat to go with every outfit they own.


Check out my current stock at Lili Reese Hats and let me know what you think. These hats usually retail for $19-$25 but I keep my pricing under $15 for each design.

Monday, January 2, 2012

Sugar High

My daughter's reaction when she saw the set up


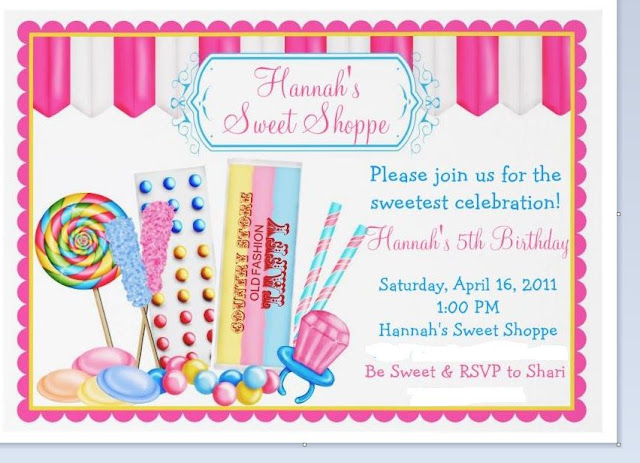
When I asked my daughter what she wanted for her 5th birthday she exclaimed, "a candy store!". But real estate costs money and I hadn't quite saved enough for a brick and mortar sweet factory. So I created a little home-based candy store right in our dining room. We invited a bunch of her little friends and their mommies and we set our sights on a fantastic sugar-high!

I ordered the custom invitations at Zazzle. I love that site. I ordered them a month in advance to be sure the would arrive on time. Here they are...


Each guest was handed a sweet bag as they came in. There was only one rule. Fill that baby up!
Treat Bags


I went on Etsy and found personalized party stickers here. I applied the stickers to the treat bags and the candy jars. I found all of the glass jars and containers at Walmart. I added a strip of ribbon wrapped around each jar to make it a little more festive.

I bought most of the bulk candy here at Oh Nuts!  I chose my daughter's faves and had some fun with their colored malted milk balls (so delicious!). The Ice Cream Sundae Malted Milk Balls were a huge hit and the colors are divine!

Ice Cream Sundae Malted Milk Balls

I also ordered a few pounds each of other colorful delights, like Laffy Taffy, Sixlets (so many gorgeous colors) and assorted candy sticks. The rock candy was a top fave among the kidlets.


I went to Costco and Walmart and picked up some boxes of popular chocolate bars and placed those items in baskets for the kids to grab.


I found the candy scoopers at Party City (those were the hardest thing to find)!
Party Store Candy Scooper (they were in the wedding section)


All guests were treated to hot dogs grilled by the husband, fresh fruit salad, cake and ice cream. Loads of chips were on hand for guests who needed to counteract the sweet with a little salt.


We still needed a birthday cake and I called some local bakeries to price out a custom candy store theme cake design. When the prices started upwards of $250 (we had about 20 people to feed), I decided that a darling color cake from Costco would suffice. It was delicious and I kept the price under $25!

My girls apparently didn't get enough candy and needed to dig into that frosting straight away!


Along with bags loaded with candy, each guest left with a t-shirt to commemorate the special day. I designed the t-shirts and had them screen printed by a local printer. I ordered an array of sizes (youth and adult) to accomodate all guests.
Everyone got a t-shirt!


Finally, I knew we had to add lots of color to transform the dining room into an official candy store. I wanted something fun and fresh, eye-catching and easy. I finally found these amazing tissue paper pom poms and hung them from the ceiling. The BEST part of these paper lovelies is that they are now a permanent fixture in our children's playroom (post to follow). You can order the tissue paper pom poms already made (you just have to separate the tissue and fluff the pom poms before you hang them). There are also tutorials available online if you want to make them from scratch. Click here for the Martha Stewart how-to version.


I won't be throwing a party like this every year but I'm happy that I was able to do something memorable and fun for my little girl and her friends.

Sunday, January 1, 2012

The Blueprint for Daily Blueprint


Welcome to Daily Blueprint, a lifestyle blog. Daily Blueprint is a collection projects, tangibles and stories that fill my days. I'm an avid shopper, photographer, children's fashionista, collector of eclectic home decor, writer, hat designer and clean freak. I love food (especially sushi) and all things spicy. The top 3 gadgets in my life include my Canon EOS, my iPad and my G2 Smartphone.

Pin it

Follow Me on Pinterest